


We're also lazy. Over the years, we've developed two catchphrases that describe our video philosophy.
Catchphrase #1: We don't watch TV; we have a machine that watches TV for us. We have jobs and an active social life (insert quote from The Breakfast Club here: "...sad and demented, but social...") We set the timer to record a lot of stuff. Even when we're at home, there are other things to do besides watching TV. Early on, we stopped trying to edit out commercials and such; life is just too short for that sort of nonsense. (In retrospect this turned out to be a very wise decision: eighteen years down the road, sometimes the commercials are much more entertaining than the shows.)
Catchphrase #2: Videotape is cheap. This was true even in the late 1980s, when tapes were $2.50 apiece in bulk; nowadays they can be had for fifty or sixty cents apiece. Catchphrase #2 has two corollaries, which we live by: When in doubt, tape it and Once it's taped, save it. That's how we wound up with more than fifteen hundred tapes.
Early on, we learned a valuable lesson about the terrible price of false economies. Thomas had bad-quality, off-the-air recordings of the PBS Hitch-hiker's Guide to the Galaxy series. After we had cable, the local PBS station decided to re-run the series. To save money, we used the same tape, recording the new over top of the old. Except -- horrors -- the old version was seven episodes, while the new was edited down to only 6. And our only copy of the 7-episode version was gone, gone. We have never found the 7-episode version again. On the plus side, we have never again erased an old or poor-quality recording until we were sure the new version was satisfactory. (Usually, we just don't erase anything, because...say it together with me, now...Videotape is cheap.)
Another thing -- since we care more about content than quality, we almost always record things on the 6-hour speed. Yes, go ahead and wince; doesn't bother us. As I said, we are neither cinephiles nor videophiles. Things we really care about, we buy on commercial DVD. Otherwise, we just want to see the show.
And one last note, something to keep in mind as you read through this document: No, we are not insane. We are SF Fans, and believe it or not, there is an important (albeit very subtle) difference.
Since Thomas and Don tend to like the same things, there was a lot of duplication in the merged collection. However, we both used the 6-hour speed and piled lots of unrelated stuff onto the same cassette. Unraveling everything to cull duplicates would involve way too much work. So we resigned ourselves to having two series of tapes, D (for Don) and T (for Thomas).
At the time, most blank videocassettes came with adhesive labels that included two or three sets of single digits, so that you could identify your tapes by attaching, say, a 5 and a 3 to indicate tape number 53. Both Thomas and Don used these, but after they passed number 100, a problem emerged: there were not enough 1s.
The solution was obvious and easy; we capped the D and T series at 120 tapes each, and started on a new series, A (for Atkinson). After we reached A:120, we started S (for Sakers). Following S:120, we started on middle initials, names of friends, names of pets...all in all, we went through T, D, A, S, G, P, C, R, F, H, M and most of J and Q before becoming Completely Overwhelmed. (It took until M to realize that we really didn't have to go past 100 with any one series.)
As the number of tapes mounted (along with the number of things we were recording), the tasks of indexing and labeling (see below) became more onerous, with the result that most of the J and Q tapes were never formally indexed or labeled. In addition, we began to have a backlog of unindexed, unlabeled, un-numbered tapes that belonged to no series. The Collection was in shambles, mystery tapes were stacked all over the place; Something Had To Be Done.
Fortunately, around this time they invented the DVD recorder, and we saw light at the end of the tunnel....
In order to understand the process of digitizing, it's important to understand how our tapes were/are labeled, cataloged, and stored.
Labeling
As detailed above, our tapes are divided into lettered series, with (usually) 120 tapes to each series. Thus, each individual tape is identified by a unique code such as A:023, F:118, P:003, etc. These codes appear on the spine of each tape. In addition, each tape has a face label that lists the contents of that tape. (Some folks list the contents of a tape on the spine. This is fine for tapes that contain three movies, but gets unweildy for tapes containing twelve half-hour sitcom episodes.)
In the beginning, we numbered tapes with stick-on digits provided with blank tapes. (As related above, the shortage of 1 digits was directly responsible for the letter-series arrangement.) Face labels were handwritten.
When we constructed custom video shelves, we decided to standardize the appearance of our labels. We designed computer-printed labels, taking the information from our catalog database (see below). Six at a time, we printed three labels for each tape: a face label listing the tapes' contents, a spine label giving the tape's alphanumeric code, and a sleeve label that also showed the alphanumeric code. We printed the labels on plain paper and attached them with wide transparent tape. At this juncture, we were able to introduce color-coding into our system, simply by printing on colored paper. This way, each letter series had a different color.
Once this system was in place, it was easy to pick out a specific tape from the shelves. Plus, everything looked nice.

|
| ABOVE: A typical face label in place. |

|
| ABOVE: A typical spine label in place. |

|
| ABOVE: A typical sleeve label in place. |
|
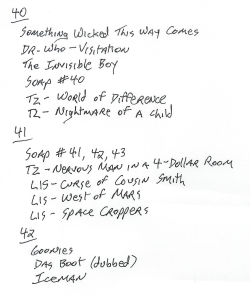
LEFT: An example of a portion of one of our handwritten lists. |
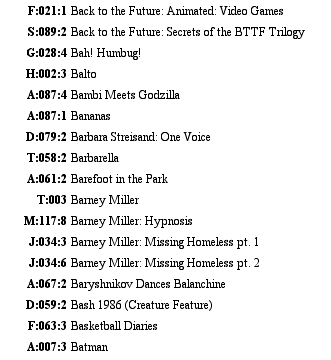
The answer was obvious. We started a new, combined list as a wordprocessing document on the computer (a Commodore 64 named Alan). This new list was by title, not tape, and it was in alphabetical order. We updated the list monthly, printing a fresh copy each time. After fumbling through dozens of handwritten sheets, a printed alphabetical list was heaven. At this stage, keeping our video list on the computer was a big convenience.
|
LEFT: This is what our printed lists looked like. |
Time passed, the Collection grew, and in 1988 we transferred the list to The Giant Space Amiga (our trusty Amiga 2000). At the same time, our needs became more sophisticated, and we set up a database instead of an alphabetical list. The database allowed us to include -- and search for -- information like genre, actors, etc. We started printing the main list quarterly, with a smaller cumulative update to cover the time between printings.
As the printed list passed 100 pages, both updating and printing became more onerous. The last printed list came around 1995; after that, we decided it was easier to simply look up things on the computer. By this time, we had plural hundreds of tapes, and we realized that keeping our catalog on the computer was no longer a convenience...it was now a necessity.
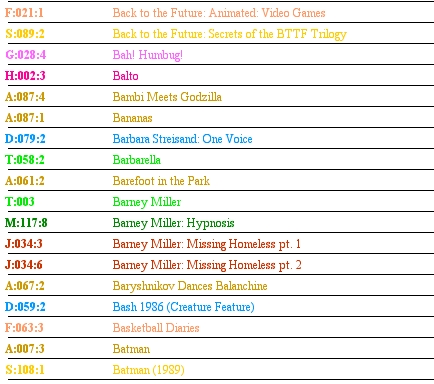
The database was useful because it could be sorted, at need, by title, tape, genre, or just about any other criterion we needed. Printing specialized lists, such as all the Dr. Who episodes in order, became simplicity itself. Around 1996-97, the video catalog moved from The Giant Space Amiga to the Mac platform: first Mac-El, our PowerBook 150; then our Bondi Blue iMac (the Meerimac). Along with the iMac came color: since the different tape series were labeled in different colors, we matched those colors in the database. A single glance could tell us the color, number, and location of the tape that held any particular program. Finally the catalog moved to JediMac, the flat-panel iMac on which the catalog resides today.
|
LEFT: This is what our database looked like onscreen. |
Maintaining a catalog of videos involves one major problem: determining what's on each tape (i.e. indexing). There are two approaches. The first (the sensible way) is to write things down as they are recorded. The second (the troublesome way) is to go back and skim through full tapes, writing down what's on each.
We always had good intentions. It's difficult to write titles on a videocassette while it's in the machine; we kept an index card for each video, and tried hard to keep running track of the contents. But we weren't always there (remember, we do a lot of unattended recording), or we wouldn't get the episode title, or we had to wait to come up with our own description, or...well, there were a million excuses for not doing it the sensible way.
Indexing full tapes is a nasty and time-consuming job. Unless you want to devote six hours to each tape, the task involves lots of fast-forwarding and rewinding to find the start and end of each program. It usually takes twenty to thirty minutes to index a single tape. The result: through the late 1990s, we fell further and further behind. Unindexed tapes piled up, until by June 2004 we had probably 200 unindexed tapes with several years' worth of programs.
Just a short digression on some special terminology that we've found useful. Sometime in the early 1990s, Renfield began to call the first episode of any series by the title "Arrival." We've kept up this practice ever since. In an astonishing number of cases, the first episode actually is called "Arrival." Even when it's not, we put "Arrival" in parentheses after the real title.
Again, when Star Trek: The Next Generation titled their first clip show "Shades of Grey," we were so amused that we started using "Shades of Grey" as a title for any clip show. (For those who don't know, a "clip show" is a retrospective episode made up of clips from previous shows. These were very common and quite popular in the days before VCRs. Nowadays, programs continue to do clip shows.)

|
| ABOVE: Videotapes on our custom shelves. |
First, there are simple physical qualities. DVDs are smaller and easier to store than videocassettes. Although all the facts aren't in, on the whole DVDs seem more stable and longer-lasting than videocassettes (some of our early videos are in the neighborhood of twenty years old -- nearly twice the accepted lifespan of 5-10 years for commercial-grade videotape).
Second, there's the fact that DVD recorders and blank recordable DVDs have finally become readily available and inexpensive enough for us to afford such a project. Our DVD current recorder cost about $250 in June 2004. By taking advantage of sales, we've been able to find blank DVDs for less than a dollar apiece in bulk. (Better prices are probably available online by buying in larger quantities.) This updates our catchphrase #2: DVD media is cheap. Stated simply, the price is right.
The most compelling reason to convert the collection, though, is the transfer from analog to digital content. Once a program is in digital form, it is potentially much more permanent. Digital content can be reproduced without loss, and can be migrated to new formats (the same way our video catalog has migrated over the years to new computer platforms). When the successor to DVD appears (we're hoping for the video equivalent of iTunes and the iPod), our collection will be poised for quick migration.
We wanted the transfer process to be as simple and painless as possible. To that end, we decided to use the extreme play-length setting for recording (our DVD recorder calls this "EP+" and we get roughly 6.5 hours per disk). From what we could see, this gave an image quality no worse than the 6-hour VHS resolution at which we had recorded most programs. (We reserved the right to make higher-quality recordings of selected programs...but again, anything we cared that much about, we would buy on commercial DVD.)
Using the 6.5-hour speed, we could easily transfer an entire videocassette to DVD without supervision. You will remember our catchphrase #1 ("We don't watch TV; we have a machine that watches TV for us.") Now we have a machine that watches all the TV that the other machine already watched for us. By letting the machines do the work when we are asleep or at our day jobs, we save an enormous amount of time. Wait until we get TiVo....
At the same time we are converting old tapes, we are also using the DVD recorder to record new content. After all, why record new stuff on tape, just to transfer it later to DVD?
Using one DVD recorder, we figure that we can convert to DVD an effective maximum of two tapes per day. This means that we expect the conversion process to take at least four years and a few months. Allowing for inevitable delays, and inspired by the original Star Trek, we're calling this "our five-year mission."

|
| ABOVE: A typical DVD printed insert. |
First and foremost, the single most important thing is this: we made a copy of our VHS tape database to work with. The original database remains intact, frozen at the point the conversion project began. Already, we've needed to refer to that old database several times; we anticipate needing it more in the future.
You may recall that our database is color-coded, with the color of text matching the color of label on each tape. We decided to use plain black-on-white for DVDs, so that we could easily distinguish DVD holdings.
First we added to the new database all our commercial, pre-recorded DVDs. (There are well over a hundred of them.) Instead of a number, we give each of these the code DVD. We shelve commercial DVDs on a bookcase in their original containers. [Okay, let's be honest -- we pile most of them on the floor by the TV, because the bookshelf is (a) a long walk away, and (b) already full.]
Next, we sorted the list by title, and found all the duplicates -- that is, things that we already had on tape, but had replaced with commercial DVDs. This included a lot of individual episodes of series like Futurama, The Simpsons, South Park, etc. We would not need to transfer these titles to DVD. This is a core realization in making the whole project easier: we would not need to transfer things that were already on DVD. All we needed to do was identify those duplicates.
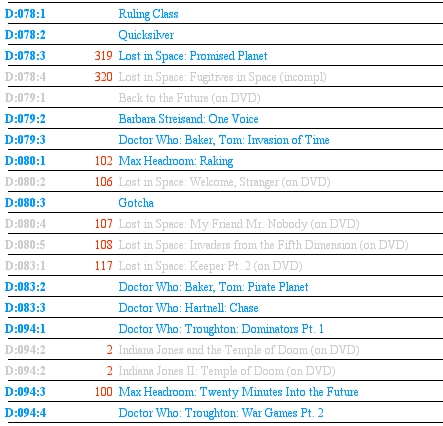
We decided to identify duplicates in the catalog in two ways. First, we added the notation "(on DVD)" after the title. Second, we changed the color of those entries to a very light grey, making them almost invisible (and very easily identifiable).
|
LEFT: A portion of our catalog, showing items that are already on DVD |
Now the catalog was ready for the project to begin.
When we transfer an entire tape to a single DVD, changing the catalog is simple. After sorting the list by number, we go through the listings for the tape in question, changing the tape number to the corresponding DVD number, and changing the text color to black. Here's what it looks like, with a hypothetical lineup of shows:
|
D:042:1 Lost in Space: Reluctant Stowaway, The D:042:2 Star Trek: Classic: Tholian Web, The D:042:3 Futurama: Anthology of Interest 1 D:042:4 Stunt Man, The D:042:5 Simpsons: Treehouse of Horror 8 |
becomes |
DVD0016:1 Lost in Space: Reluctant Stowaway, The DVD0016:2 Star Trek: Classic: Tholian Web, The DVD0016:3 Futurama: Anthology of Interest 1 DVD0016:4 Stunt Man, The DVD0016:5 Simpsons: Treehouse of Horror 8 |
Some DVDs contain entirely new (unindexed) material. We enter these from scratch, just the way we did with the old tapes.
Often, a DVD contains something from one tape, something from another, and one or two unindexed programs. With things from a tape, we change the numbers and colors as above; with the unctaloged stuff, we make new entries. Gradually, listings for tapes will vanish, replaced by DVDs. When we have no more tapes listed, we're done.
Along the way, we are always conscious of finding and greying-out duplicate entries.
Once a disk is indexed, we use cut-and-paste to transfer the information to a template that prints a paper insert, and we're done.
Another great time-saver involves all those unmarked, unindexed tapes that are sitting around. We've found it much easier to transfer these to DVD first and then index them. DVDs allow random access, whereas tapes are sequential only. indexing a disk goes a lot faster than indexing a tape. We developed a custom form that helps a lot (see below).
We also took this opportunity to add a new field to our database: Date Recorded. We just never thought of it before. With a lot of the old tapes, we have to estimate -- but in a surprising number of cases, we find something on the tape that gives the date (or at least the month and year). It might be the tail end of a news broadcast ("That's the news for today, March 3, 1987"), or a commercial for a movie ("opens Friday, March 3 in theaters nationwide"), or even a car commercial ("The Memorial Day sales event ends Tuesday, so hurry"). Also, we record a lot of programs when they are first broadcast; episode guides available on the Web often give this date. (One great site for episode guides is www.tvtome.com.)
On the subject of Web resources, Yahoo TV listings (tv.yahoo.com) are usually more accurate and up-to-date than TV Guide (a bare shadow of its former self), and often give exact episode titles. Most important, since disks are so easy to index, we are able to keep up with the inflow. We have reached the nirvana of indexing on-the-fly: being able to write things down as we record them (or soon after). If all goes well, we should never develop a backlog of unindexed, unmarked disks.
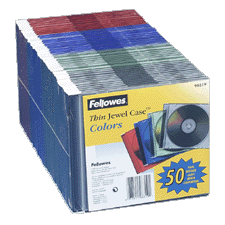
|
| ABOVE: Thin jewel cases, pack of 50. |
These thin jewel cases come in an assortment of colors, which turns out to be very helpful. Instead of putting spine labels on every case, we use small tags on every tenth disk (10, 20, 30, 40, etc.) and we change colors every five disks. We try to alternate light colors with dark, to make the difference more obvious.
As mentioned above, we use our existing VHS shelves for DVDs. The height is perfect. Five DVDs are almost exactly the same width as one videocassette; we reckon that we can store 175 DVDs on a shelf that held 36 videocassettes. It's depth that's the problem; at 8 inches, our shelves are about three inches too deep. A solution is close at hand. Three videocassettes stacked against the back of the shelf make a perfect backstop. Fortunately, we have no shortage of used videocassettes. If we construct new custom shelves in the future, we'll make them less deep.

|
LEFT: DVDs in their multicolor cases on our custom shelves. (underneath a row of videotapes awaiting conversion) |
We continue to shelve commercial, pre-recorded DVDs on bookshelves, in alphabetical order. It seems the best way.
Disk quality: We have read alarming stories of dye deterioration rendering CDs and DVDs unreadable after a while. The best advice we've found says to stick with silver or gold DVDs, rather than ones made with blue or green dyes.
Yeah, right. Try to find gold DVDs at any affordable price. The cheap, bulk DVDs we've been buying are blue. We decided to live with the risk, for now. When the more reliable disks get cheaper in the future, we can copy existing blue disks onto better ones. We hope this will happen before there's any deterioration.
On a related subject, so far we've had good luck with blank DVDs. As these words are being written, we're recording DVD number 0175 -- so far, we've only had two or three disks fail.
Recording Speed: As mentioned above, we're using the slowest recording speed. On our DVD recorder, that's called "EP+" and it puts about 6.5 hours on a disk. The quality (to our eyes) is comparable to the 6-hour speed on VHS.
Of course, this means that we have some time left over when we copy a 6-hour tape -- usually a half hour or a little more. Since we're fans of just about anything on Nickelodeon, we've taken to leaving the cable box set for Nick so that when a tape runs out, we might get a bonus on the disk -- an episode or two of Rugrats or Jimmy Neutron or Fairly Oddparents, for example.
Chaptering: Our DVD recorder allows us to set an interval for auto-chaptering. At first, we set it for ten minutes...but we very quickly changed that to four minutes, which is the smallest interval our machine allows. We recommend setting auto-chapter to the smallest interval possible. Two minutes would be ideal. It makes indexing disks a lot easier.
As explained above, we identify such duplicates in the catalog. Before we get ready to convert some tapes, we check those tapes against the catalog. On the tape face label, we use a Sharpie (remember, not a Shar-pei!) to physically cross out duplicate items.
Then it becomes a process somewhat akin to putting together a jigsaw puzzle. Three half-hour programs from D:047 plus a two-hour movie from D:063 plus 1.5 hours of Dr. Who from D:073 completes the conversion of those three tapes, and still leaves an hour to record tonight's Stargate and, with luck, a Family Guy. Repeat until all tapes are converted.
Attended vs. Unattended Recording: Obviously, this piecing-together of partial tapes works best when you can pay attention to the machines, checking back at appropriate intervals. We try to reserve whole tapes for when we're asleep or at our day jobs, when we can just let the machines run unattended for six and a half hours.
Forms: To aid indexing and cataloging, we've developed a nice form that we print out fifty or so at a time. Using Scotch Restickable Adhesive gluesticks, we turn these forms into pads of Post-Its that stick to the front of a jewel case. Here's what our form looks like:
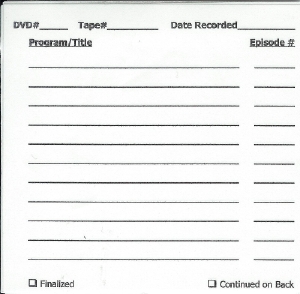
|
LEFT: Our form for indexing DVDs on the fly. |
The Problem of Tracking: VCRs vary in quality, and each one seems to have a different default setting for tracking. Over the years, we've used many different VCRs. Currently, we have two main VCRs, both from the same manufacturer. VCR One is a dream: it has "digital tracking," and can adjust its own tracking to reliably play videocassettes recorded on just about any other machine (with one major exception). VCR Two is a nightmare: It will only reliably play its own videocassettes. Cassettes recorded on any other machine come out with terrible tracking lines at the top, bottom, or middle of the screen. In addition, this VCR often causes picture rolling on our DVD recorder. And as a final insult, videocassettes recorded on VCR Two are the only ones that can defeat the digital tracking on VCR One.
The bottom line: Tapes recorded on VCR Two can only be played on VCR Two. And VCR Two can only play its own tapes. The major problem is that VCR Two has been our main machine for a good number of years now, so we have an enormous backlog of tapes that can only be played on that machine.
Care and Repair of Aging Videocassettes: Some of our videocassettes are approaching twenty years old. The biggest problem we've had is with tape snapping on rewind. When you're rewinding a tape at full speed, the sudden stop at the end sometimes breaks the tape or (more often) snaps the leader off the takeup reel. Fortunately, this is a simple problem to fix. More complicated is the problem of a tape that breaks in the middle. There are some basic instruction for salvaging a broken tape at http://www.ehow.com/how_113992_salvage-videocassette.html.
Basically, you need to open up the videocassette (five screws), carefully separate the halves (pay careful attention to the path the tape follows and where all the little fiddly bits go). For a snapped leader, attach the broken end to the takeup reel with scotch tape. For a tape that's broken in the middle, you need to make one videocassette into two (see the link above).
If you've never done this sort of thing before, dismantle a couple of practice tapes first so you can see how everything works. Beware of the tiny springs that can go shooting off across the room.
Never, never, never splice videotape with scotch tape or any other kind of adhesive. This will probably destroy the heads on your VCR.
The Problem of Incompatible DVD Formats and Players: Recordable DVDs come in two types, DVD-R and DVD+R (we call them "minus" and "plus" respectively). Our DVD recorder uses DVD+R. The DVD R/W drive in our iMac uses DVD-R. The iMac drive doesn't recognize DVDs that we've recorded on the DVD recorder, even to play them.
We understand that this isn't unusual; DVD players and DVD computer drives are notoriously finicky about reading disks that are even slightly nonstandard. For example, our downstairs DVD player has no trouble with disks made on the recorder...while the upstairs DVD player will play them fine, but gets confused if we try to rewind or fast-forward at more than 2X.
From what we've heard and read, DVD players keep getting better, and a later-model machine is more likely to be able to play whatever you throw at it.
This would bother us a lot more, if it weren't for that fact that brand-new DVD players are $35 at Target. Soon we'll be getting them free in our breakfast cereal.
Incidentally, when we record things on a DVD, that disk remains "open" until we perform an operation known as "finalizing." While a disk is open, new stuff can be added (up to the disk's capacity). While a disk is open, it can't be played on a conventional DVD player -- just on the recorder. After a disk is finalized, nothing more can be recorded on it, and it will play in a regular DVD player. A disk can be finalized even if it's not filled; in theory, I guess you could finalize a disk with just a few minutes of programming on it. Just thought it was worth mentioning.
Reviewing: We've found it helpful to review each DVD after it's complete. This assures us that what's supposed to be there, actually is there, and to catch any major problems (excessive tracking problems or picture rolling, etc.). It also allows us to catch any extra programs that escaped cataloging over the last two decades. We've already found some lost gems this way. Perhaps eventually we'll find that lost Animaniacs 65th Anniversary Special....
What To Do With Old Videocassettes: Eventually, we're going to have about 1,500 old videocassettes to dispose of. The question of what to do with them has two dimensions: what to do immediately, and what to do in the long run.
Immediately, we needed a way to mark tapes that were converted to DVD. We settled on bright, adhesive dots, which we attach to the video sleeve or the videocassette itself.

|
LEFT: Bright, adhesive dots. |
Long term, we've decided to hang onto our old videocassettes for now. We don't want to get rid of them until we're sure that the DVD versions are reliable and everything is okay. We are boxing them and putting them in the attic.
In the very long term, we will need to find some way to get rid of a lot of old, old videocassettes. Somehow we doubt that there are thousands of starving children in India who would love to have them. Since they contain copyrighted material, we can't very well sell them on eBay or anything like that. So far, we haven't come up with a good solution that doesn't involve a landfill.
We are open to any suggestions for recycling....
How Long Will This Take? At the moment, we're planning on a five year mission. That's just an estimate, based on converting 1,500 tapes at an average of two a day. Naturally, there are a lot of factors that could change that estimate (we deal with a few of them below). At the moment, we're treating "five years" more as a metaphor than an actual timetable. As these words are being written, we've been at work for about three months, and we've converted perhaps 100 tapes total...that works out to almost four years. But summer is almost over, and we're going to be recording more new stuff once the new TV season starts (although not a lot...what a pathetic season this is shaping up to be).
A Word About VCRs: Over the course of the next five years, we expect to be running our VCR at least twelve hours a day, often longer. That's an awful lot of wear & tear on the poor machine. Consequently, we expect that we'll use up several VCRs in the process. We'll probably use up a DVD recorder or two, as well.
DVD recorders are not a problem -- they keep getting cheaper and better. VCRs, however, are a different story. They're about as cheap as they're going to get...and sometime before our five year mission is over, we anticipate that manufacturers will stop making them.
Just in case, we're going to stock up over the next few years, so that we have three or four brand-new VCRs in the closet. We suggest that you do the same.
Multiple Recorders: As prices of DVD recorders continue to fall, we anticipate getting one or two more. Obviously, two VCR-DVD recorder pairs would double our production and halve the completion time. Given our limitations, we figure that three would be the ideal number.
High-Speed Digitizing: The Holy Grail would be some form of high-speed digitization. We picture a dedicated machine that would accept both VHS tapes and blank DVDs, whirr to itself for a half-hour or so, and then spit out a DVD copy of the tape. We imagine that such a machine will come out just as we near the end of our digitizing process. Ah, well, c'est la vie, c'est la guerre, c'est la grille pan.
Don's Ideal Video Recorder: For twenty years, Don has had a vision of his ideal video recording machine. TiVo is a step in the right direction, but there's still a long way to go. Don's ideal video recorder would store at least a week's worth of programming on all channels, so that when you're reading TV Guide and you notice a great program that was on three days ago, or when someone says, "Did you see that really good documentary on pre-Columbian contact between the Eastern and Western Hemispheres," you'll be able to punch up the program and watch it.
Combine this machine with the super-video-iTunes/iPod, and you'd really have something to crow about.
The ultimate step, of course, is all video on demand, any time, any place, every program that's ever been broadcast. (We envision, of course, a fleet of faster-than-light ships that will fan out and capture TV transmissions from the early days of live television.) Of course, by then our current TV programs will look awfully pale compared to the full-immersion virtual reality that will be the state of the art....